

Best Cable Management Solutions for Home Office 2026
Table of Contents
- Quick Comparison: Top Cable Management Solutions
- Under Desk Cable Tray: The Backbone of a Clean Setup
- Cable Management Sleeves and Wraps: Bundling Made Simple
- How to Organize Desk Wires: A Step-by-Step Method
- No-Drill and Rental-Friendly Cable Management Solutions
- Standing Desk Cable Management: Keeping Cables Safe in Motion
- Cable Longevity and Heat Management: What Most Guides Skip
- Conclusion: Picking the Right Cable Management Solution
- Frequently Asked Questions
Last Updated: September 27, 2026
Quick Comparison: Top Cable Management Solutions
The best cable management solutions for home office setups are under-desk trays for power bricks, sleeves for bundling loose runs, and adhesive clips for rental-friendly tidiness. Start with one anchor point, usually an under-desk tray or cable raceway, then bundle everything that runs to it. Here's the short version:
Solution |
Best For |
Rental-Friendly |
Typical Cost |
|---|---|---|---|
Under-desk cable tray |
Power bricks and surge protectors |
No (screws in) |
Low |
Cable sleeve or wrap |
Bundling monitor and charger runs |
Yes |
Very low |
Adhesive clips and mounts |
Quick routing along desk edges |
Yes |
Very low |
Cable raceway |
Wall-to-desk runs |
Mixed (adhesive versions exist) |
Low |
Cable management box |
Hiding a power strip on the floor |
Yes |
Low |
Under Desk Cable Tray: The Backbone of a Clean Setup
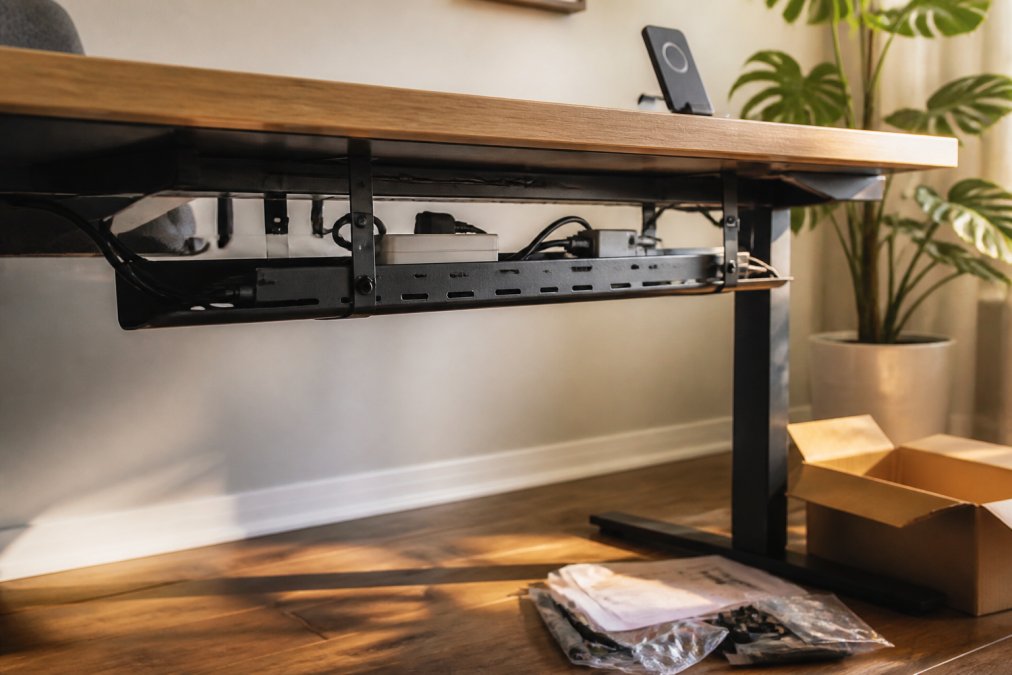
An under-desk cable tray is a shallow metal or plastic channel that mounts beneath the desktop and holds power strips, adapters, and slack cable. It is the highest-impact upgrade for most home offices because the power strip, brick chargers, and coiled slack all disappear into one contained zone. Mount the surge protector inside first, then route each device cable to it with a little slack, so the tray becomes a distribution point rather than a junk drawer.
Sizing and load: what actually fits
Trays are sold by length and depth, and the numbers that matter are interior width (does your surge protector fit?) and mounting height (does it clear your knees and drawer hardware?). A typical tray runs 16 to 24 inches long and 4 to 6 inches deep, enough for a 6-outlet surge protector plus two or three power bricks. Measure your strip first; a 12-outlet strip with wide spacing won't fit a narrow tray.
Mounting methods and their trade-offs
- Clamp-on trays grip the desk edge with a C-clamp and need no drilling. They work on desks with a square lip and a flat underside, and can be repositioned without a mark, the best choice for rentals and glass or thin desktops where screws would crack or strip.
- Screw-mounted trays attach with wood screws into the underside of a solid-top desk. They hold the most weight and never shift, but the holes are permanent and the screws can split particleboard if you overtighten or skip pilot holes.
- Adhesive-mounted trays use heavy-duty mounting tape and are the least secure option. They suit very light loads and fail faster in warm rooms, which is exactly where power adapters live.
Desk-type constraints most guides ignore
Not every desk accepts a tray:
- Glass desks cannot take screws and often have no lip for a clamp. Adhesive is the only option, and it must be rated for glass; keep the load minimal.
- Floating or wall-mounted desks frequently have no accessible underside or a shallow apron, so a tray may not fit. A cable management box on the floor or a wall raceway is the better answer.
- Desks with a full back panel or modesty panel hide cables already, but the panel blocks clamp access. Route along the panel instead of under the top.
- Standing desks need the tray mounted to the moving surface, not the frame leg.
Aesthetic vs. functional: the trade-off to decide up front
A tray can hide cables completely or keep them reachable, but rarely both. If you swap devices often, leave the tray open with visible slack; if the setup is fixed, close it up and bundle tight. A few practical notes:
- Leave 2 to 3 inches of slack per cable so nothing pulls tight when the desk shifts
- Route power cables separately from data cables to reduce interference
- Keep power bricks spaced apart rather than stacked, so heat can escape
- Check the tray's screws or clamps after the first week, then every few months
Cable Management Sleeves and Wraps: Bundling Made Simple
Cable management sleeves are flexible tubes, usually neoprene or braided mesh, that wrap around several cables to turn them into one clean run. They cost little and install in minutes, making them the easiest first step for anyone overwhelmed by loose wires.
- Coiling excess slack behind a monitor
- Securing a bundle to a desk leg
- Grouping cables by destination rather than by type
How to Organize Desk Wires: A Step-by-Step Method
Organizing desk wires works best in five stages: unplug everything, group cables by destination, mount your anchor point, route and bundle, then label and test. Skipping the unplug step is the most common mistake, because you end up routing around cables that should have been removed.
- Unplug and clear the desk (10 minutes). Remove every cable, then plug back in only what you use daily. The orphaned cables you set aside are the real win, most desks carry two or three retired devices.
- Group by destination (5 minutes). Monitor cables together, charging cables together, floor-bound cables together. Grouping by where a cable ends, not by what it is, keeps troubleshooting simple later.
- Mount the anchor (15 to 20 minutes). Install the tray, raceway, or box that holds your power strip: clamp-on for rentals and glass, screw-mount for solid-wood desks, adhesive only for light loads.
- Route with slack (15 minutes). Run each bundle along a fixed path, leaving a small loop at both ends. The loop is strain relief, it prevents a cable from pulling tight and failing at the connector.
- Label both ends (5 minutes). A strip of tape and a marker beats any fancy labeling system, because you can read it in a dark space behind the desk.
- Test before you tidy (5 minutes). Power everything on, confirm it works, then close the sleeves. Tidying first is how you end up reopening every bundle to find one loose plug.
Choosing your anchor point
The anchor is the fixed point everything routes to, and choosing it well separates a setup that holds for years from one that unravels in weeks:
- Under-desk tray, best for power bricks and surge protectors, hides the most, requires mounting.
- Cable management box, best when you cannot mount anything, sits on the floor, hides the strip but not the runs to it.
- Wall raceway, best for a long wall-to-desk run, keeps cables off the floor, adhesive versions come off cleanly in rentals.
Where this method usually fails
Most cable management falls apart at one of three points:
ype-C Micro USB Smart IR Remote Control →
- Too little slack. A cable routed tight looks clean and fails fast. Leave a loop at both ends, and for a standing desk, enough slack to cover the full height range plus a few inches.
- Cheap adhesive on a dirty surface. Wipe the mounting spot with rubbing alcohol and let it dry before pressing clips or raceways on, or the clips release within weeks, especially in humid rooms.
- Bundling power and data too tightly. Running high-draw power cables in the same tight sleeve as sensitive data cables can introduce interference and traps heat. Keep power runs separate, and keep bundles loose enough to slide a finger between cables.
No-Drill and Rental-Friendly Cable Management Solutions
For wall-to-desk runs in a rental, adhesive raceways come off cleanly with a little warmth from a hair dryer. Test on an inconspicuous patch first, since some paints lift more easily than others.
Standing Desk Cable Management: Keeping Cables Safe in Motion
Standing desk cable management requires slack, not tightness. A desk that rises and falls will yank any cable routed without a service loop, and repeated strain eventually breaks a connector or pulls a plug loose. Give every cable enough slack to cover the full height range, plus a little more, and coil the excess into a loop secured to the underside with a Velcro strap so it travels with the desk instead of snagging on the floor.
- Mount the power strip to the desk, not the wall, so it moves with the surface
- Use a cable management spine for the run from desk to floor
- Keep floor-bound cables in a sleeve so they slide rather than catch
- Check the loop after a week of daily height changes
Cable Longevity and Heat Management: What Most Guides Skip
Cable longevity comes down to strain relief, airflow, and separation of power from heat sources. Cables fail at the connector far more often than along the wire, usually from repeated pulling or bending at a sharp angle:
- Leave a gentle curve where a cable meets the plug, never a hard fold
- Keep power adapters out of enclosed drawers where heat builds
- Avoid running cables under a rug where foot traffic crushes them
- Replace any cable showing fraying near the connector immediately
- Keep bundles loose enough that you can slide a finger between cables
Conclusion: Picking the Right Cable Management Solution
The best cable management solutions for home office setups are matched to your constraints, not the ones with the most parts. If you rent, start with adhesive clips and a cable management box. If you own the space and use a standing desk, an under-desk tray plus a spine handles almost everything.
Frequently Asked Questions
What is the best way to manage cables on my home office desk?
Start with an under desk cable tray to hold your power strip and surge protector off the floor, then bundle loose cords with cable management sleeves or Velcro straps. Route cables along the desk legs using adhesive clips, and leave a small loop of slack near each device so nothing pulls tight. This three-layer approach, tray, sleeve, clip, handles most home office setups and keeps cables reachable when you need to swap a device.
Are cable sleeves or cable trays better for home offices?
They solve different problems, so most setups benefit from both. Cable management sleeves bundle multiple cords into one tidy run, which works well for the stretch between your desk and the wall. An under desk cable tray carries the weight of a power strip and keeps heavy cables off the floor. Use sleeves for the visible run and a tray for the hardware, and you cover both the look and the load.
How can I hide power strips and surge protectors under my desk?
Mount a cable tray or a cable management box under the desktop and place the power strip inside it. This keeps the strip off the floor, away from dust and feet, and hides the outlet block entirely. Leave the strip's switch facing outward so you can reach it without crawling underneath. If you rent and cannot drill, use adhesive-backed mounts rated for the strip's weight, or a floor-standing cable management box behind the desk.
How do I keep cables from falling off the back of my desk?
Adhesive-backed cable clips are the simplest fix. Stick them along the back edge or the desk leg, press each cable into the clip, and add a small service loop above the clip so the cable is not pulling straight down. For heavier bundles, use a screw-mounted clip or route the cables through a tray instead. Clean the surface with rubbing alcohol before applying adhesive clips, since dust is the main reason they fail.
What are the best cable management accessories for standing desks?
Standing desks need slack, not tension. Use a cable management spine or a flexible sleeve that expands and contracts as the desk rises, and mount a tray under the desktop to carry the power strip with the desk. Leave a loop of slack at the wall end so the cable has room to travel. Avoid tight zip ties on the moving section, because they can pinch cables as the desk cycles up and down.